By: Team F11-4 Since: Aug 2018 Licence: MIT
1. Setting up
1.1. Prerequisites
-
JDK
9or later.JDK 10on Windows will fail to run tests in headless mode due to a JavaFX bug. Windows developers are highly recommended to use JDK9. -
IntelliJ IDE
IntelliJ by default has Gradle and JavaFx plugins installed.
Do not disable them. If you have disabled them, go toFile>Settings>Pluginsto re-enable them.
1.2. Setting up the project in your computer
-
Fork this repo, and clone the fork to your computer
-
Open IntelliJ (if you are not in the welcome screen, click
File>Close Projectto close the existing project dialog first) -
Set up the correct JDK version for Gradle
-
Click
Configure>Project Defaults>Project Structure -
Click
New…and find the directory of the JDK
-
-
Click
Import Project -
Locate the
build.gradlefile and select it. ClickOK -
Click
Open as Project -
Click
OKto accept the default settings -
Open a console and run the command
gradlew processResources(Mac/Linux:./gradlew processResources). It should finish with theBUILD SUCCESSFULmessage.
This will generate all resources required by the application and tests. -
Open
XmlAdaptedPerson.javaandMainWindow.javaand check for any code errors-
Due to an ongoing issue with some of the newer versions of IntelliJ, code errors may be detected even if the project can be built and run successfully
-
To resolve this, place your cursor over any of the code section highlighted in red. Press ALT+ENTER, and select
Add '--add-modules=…' to module compiler optionsfor each error
-
-
Repeat this for the test folder as well (e.g. check
XmlUtilTest.javaandHelpWindowTest.javafor code errors, and if so, resolve it the same way)
1.3. Verifying the setup
-
Run the
seedu.address.MainAppand try a few commands -
Run the tests to ensure they all pass.
1.4. Configurations to do before writing code
1.4.1. Configuring the coding style
This project follows oss-generic coding standards. IntelliJ’s default style is mostly compliant with ours but it uses a different import order from ours. To rectify,
-
Go to
File>Settings…(Windows/Linux), orIntelliJ IDEA>Preferences…(macOS) -
Select
Editor>Code Style>Java -
Click on the
Importstab to set the order-
For
Class count to use import with '*'andNames count to use static import with '*': Set to999to prevent IntelliJ from contracting the import statements -
For
Import Layout: The order isimport static all other imports,import java.*,import javax.*,import org.*,import com.*,import all other imports. Add a<blank line>between eachimport
-
Optionally, you can follow the UsingCheckstyle.adoc document to configure Intellij to check style-compliance as you write code.
1.4.2. Updating documentation to match your fork
After forking the repo, the documentation will still have the SE-EDU branding and refer to the se-edu/addressbook-level4 repo.
If you plan to develop this fork as a separate product (i.e. instead of contributing to se-edu/addressbook-level4), you should do the following:
-
Configure the site-wide documentation settings in
build.gradle, such as thesite-name, to suit your own project. -
Replace the URL in the attribute
repoURLinDeveloperGuide.adocandUserGuide.adocwith the URL of your fork.
1.4.3. Setting up CI
Set up Travis to perform Continuous Integration (CI) for your fork. See UsingTravis.adoc to learn how to set it up.
After setting up Travis, you can optionally set up coverage reporting for your team fork (see UsingCoveralls.adoc).
| Coverage reporting could be useful for a team repository that hosts the final version but it is not that useful for your personal fork. |
Optionally, you can set up AppVeyor as a second CI (see UsingAppVeyor.adoc).
| Having both Travis and AppVeyor ensures your App works on both Unix-based platforms and Windows-based platforms (Travis is Unix-based and AppVeyor is Windows-based) |
1.4.4. Getting started with coding
When you are ready to start coding,
-
Get some sense of the overall design by reading Section 2.1, “Architecture”.
-
Take a look at [GetStartedProgramming].
2. Design
2.1. Architecture
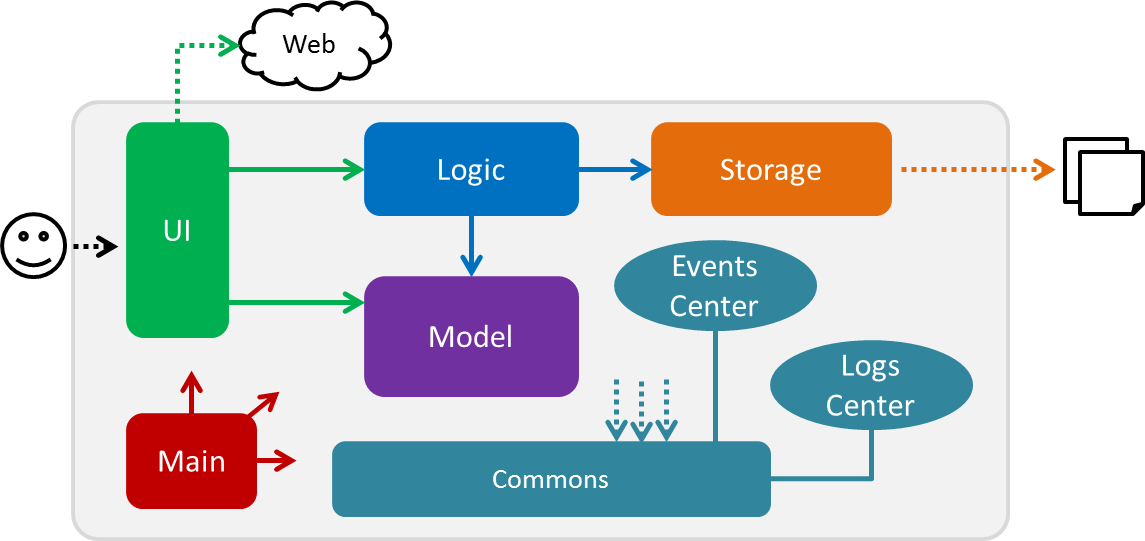
The Architecture Diagram given above explains the high-level design of the App. Given below is a quick overview of each component.
The .pptx files used to create diagrams in this document can be found in the diagrams folder. To update a diagram, modify the diagram in the pptx file, select the objects of the diagram, and choose Save as picture.
|
Main has only one class called MainApp. It is responsible for,
-
At app launch: Initializes the components in the correct sequence, and connects them up with each other.
-
At shut down: Shuts down the components and invokes cleanup method where necessary.
Commons represents a collection of classes used by multiple other components. Two of those classes play important roles at the architecture level.
-
EventsCenter: This class (written using Google’s Event Bus library) is used by components to communicate with other components using events (i.e. a form of Event Driven design) -
LogsCenter: Used by many classes to write log messages to the App’s log file.
The rest of the App consists of four components.
Each of the four components
-
Defines its API in an
interfacewith the same name as the Component. -
Exposes its functionality using a
{Component Name}Managerclass.
For example, the Logic component (see the class diagram given below) defines it’s API in the Logic.java interface and exposes its functionality using the LogicManager.java class.
Events-Driven nature of the design
The Sequence Diagram below shows how the components interact for the scenario where the user issues the command delete 1.
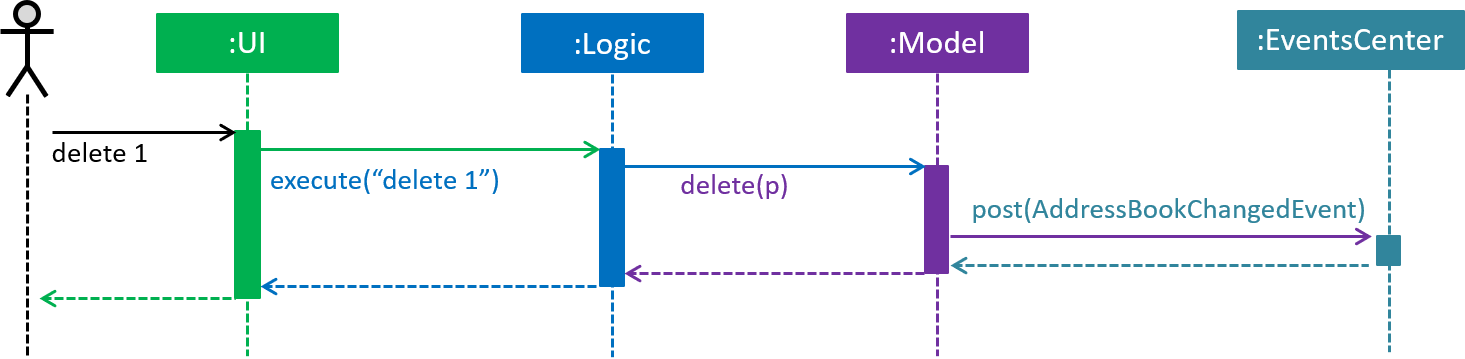
delete 1 command (part 1)
Note how the Model simply raises a AppChangedEvent when the NUS Hangs Address Book data are changed, instead of asking the Storage to save the updates to the hard disk.
|
The diagram below shows how the EventsCenter reacts to that event, which eventually results in the updates being saved to the hard disk and the status bar of the UI being updated to reflect the 'Last Updated' time.
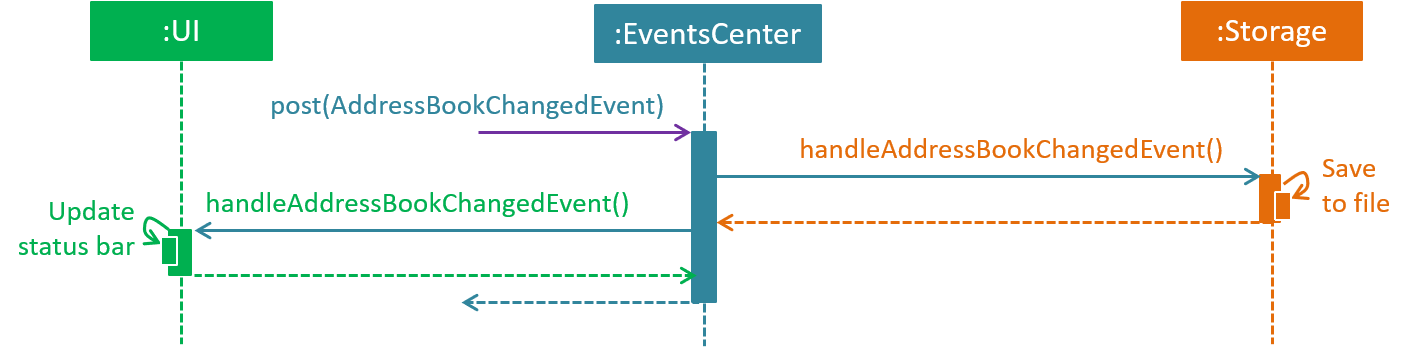
delete 1 command (part 2)
Note how the event is propagated through the EventsCenter to the Storage and UI without Model having to be coupled to either of them. This is an example of how this Event Driven approach helps us reduce direct coupling between components.
|
The sections below give more details of each component.
2.2. UI component
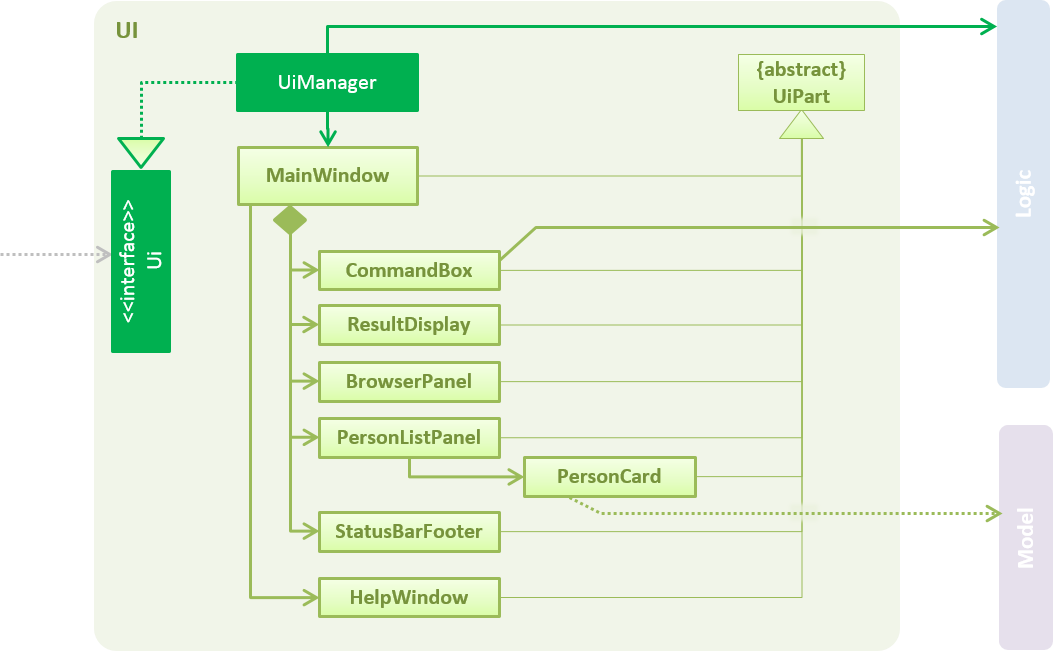
API : Ui.java
The UI consists of a MainWindow that is made up of parts e.g.CommandBox, ResultDisplay, PersonListPanel, StatusBarFooter, BrowserPanel etc. All these, including the MainWindow, inherit from the abstract UiPart class.
The UI component uses JavaFx UI framework. The layout of these UI parts are defined in matching .fxml files that are in the src/main/resources/view folder. For example, the layout of the MainWindow is specified in MainWindow.fxml
The UI component,
-
Executes user commands using the
Logiccomponent. -
Binds itself to some data in the
Modelso that the UI can auto-update when data in theModelchange. -
Responds to events raised from various parts of the App and updates the UI accordingly.
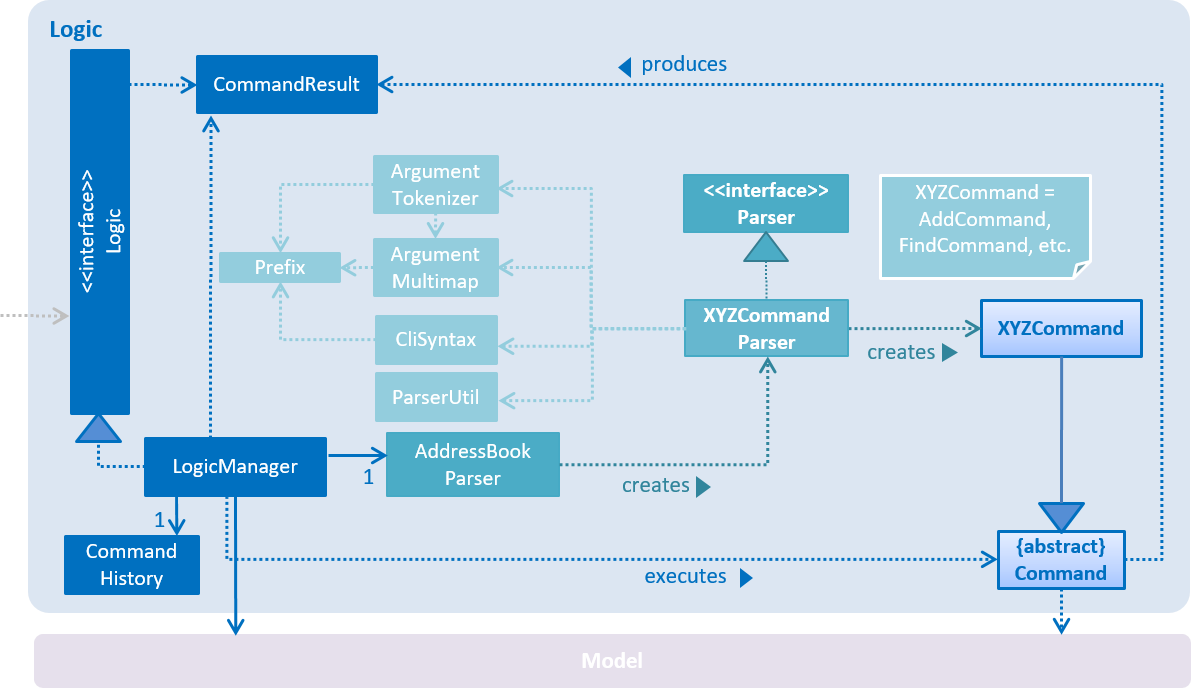
2.3. Logic component
API :
Logic.java
-
Logicuses theAddressBookParserclass to parse the user command. -
This results in a
Commandobject which is executed by theLogicManager. -
The command execution can affect the
Model(e.g. adding a person) and/or raise events. -
The result of the command execution is encapsulated as a
CommandResultobject which is passed back to theUi.
Given below is the Sequence Diagram for interactions within the Logic component for the execute("delete 1") API call.

delete 1 Command2.4. Model component
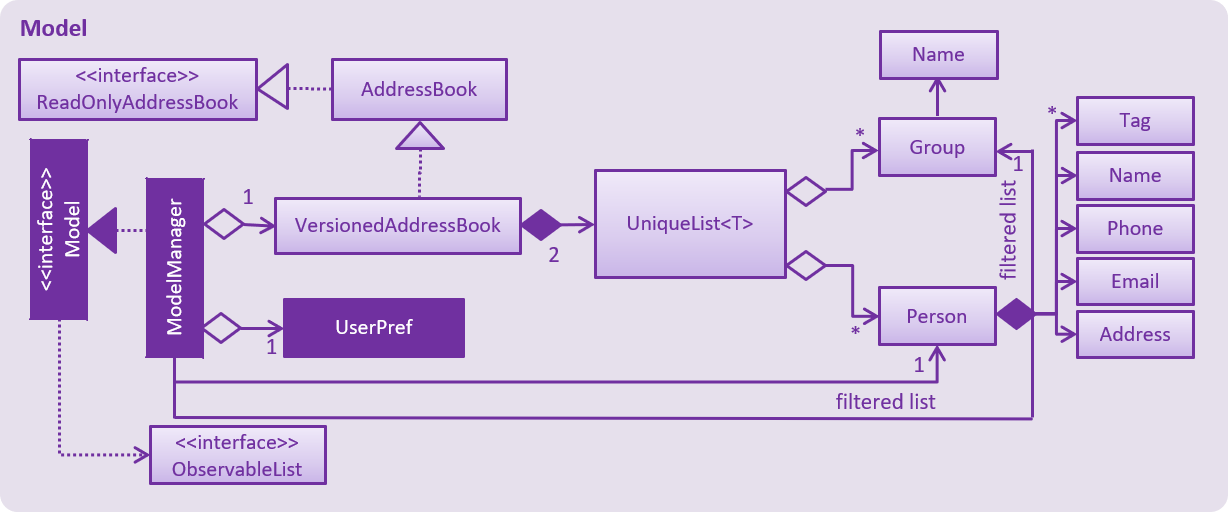
API : Model.java
The Model,
-
stores a
UserPrefobject that represents the user’s preferences. -
stores the NUS Hangs Address Book data.
-
exposes an unmodifiable
ObservableList<Person>that can be 'observed' e.g. the UI can be bound to this list so that the UI automatically updates when the data in the list change. -
does not depend on any of the other three components.
2.5. Storage component
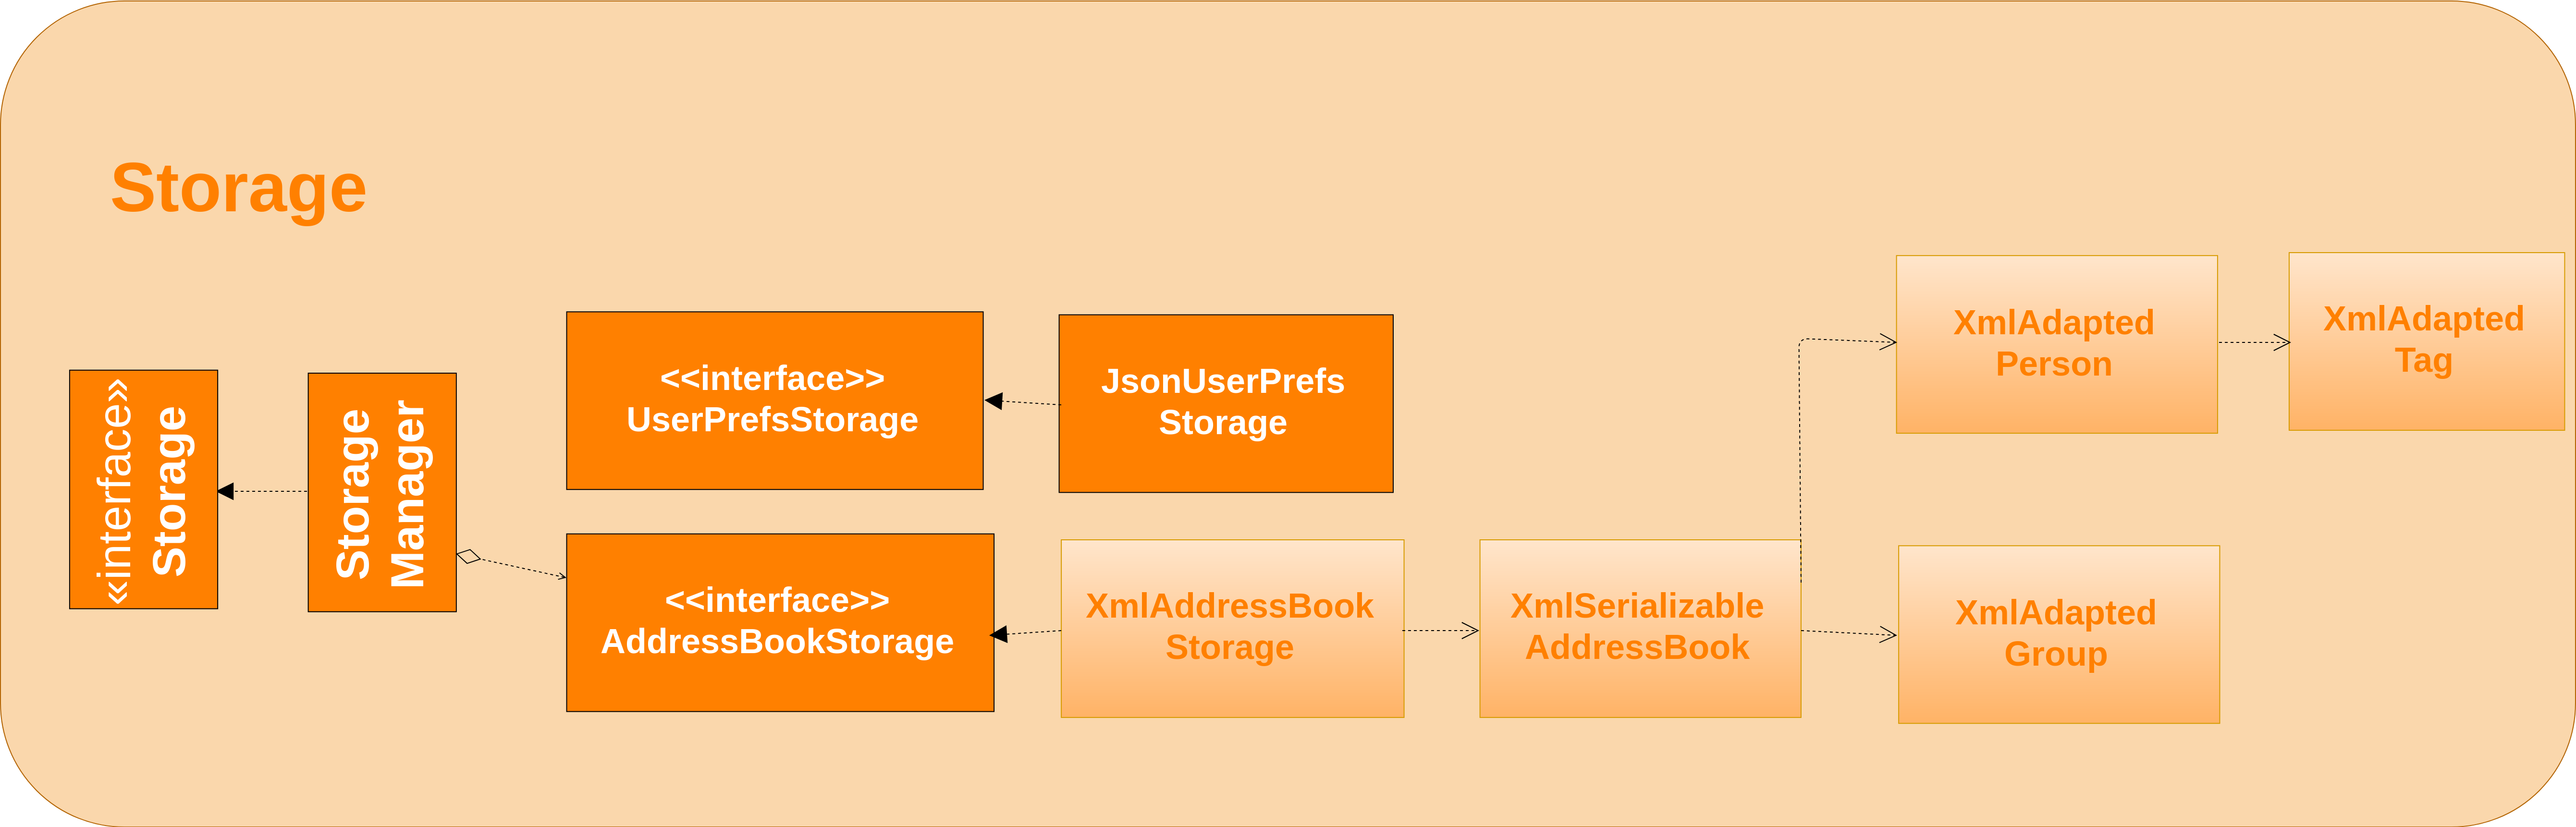
API : Storage.java
The Storage component,
-
can save
UserPrefobjects in json format and read it back. -
can save NUS Hangs data in xml format when app closes and load it back when app is reopened.
2.6. Common classes
Classes used by multiple components are in the seedu.Erium.commons package.
2.7. Logging
We are using java.util.logging package for logging. The LogsCenter class is used to manage the logging levels and logging destinations.
-
The logging level can be controlled using the
logLevelsetting in the configuration file (See Section 2.8, “Configuration”) -
The
Loggerfor a class can be obtained usingLogsCenter.getLogger(Class)which will log messages according to the specified logging level -
Currently log messages are output through:
Consoleand to a.logfile.
Logging Levels
-
SEVERE: Critical problem detected which may possibly cause the termination of the application -
WARNING: Can continue, but with caution -
INFO: Information showing the noteworthy actions by the App -
FINE: Details that is not usually noteworthy but may be useful in debugging e.g. print the actual list instead of just its size
2.8. Configuration
Certain properties of the application can be controlled (e.g App name, logging level) through the configuration file (default: config.json).
3. Implementation
This section describes some noteworthy details on how certain features are implemented.
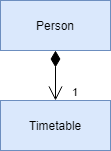
3.1. Timetable Feature
As shown in the diagram below, timetable and person classes are associated. A person contains 1 timetable.
3.1.1. Reason for implementation
The objective of the add_timetable feature is to to add data entries of a timetable into NUS Hangs. But it is hard to visualise the adding of the entries so we allowed user to add directly all the entries from a csv file. For edit_timetable , it is for User who just want to edit entries without going to find the timetable. For download_timetable, it is to allow the user to share their timetable to their friends.
3.1.2. How to implement
For add_timetable , we create a timetable class in person first, then we create a timetableData class with method to create a String [][] Matrix from the data from the csv file. Then we create a timetableString to which contains information on the entries about the timetable and store it in the xml file of the person in the addressbook.
3.1.3. Current Implementation
The current timetable commands are:
-
add_timetable— adds a timetable from the csv file to the person. -
delete_timetable— delete a timetable from the person and creates a default timetable in person. It will also find the timetable csv file of the person and deletes it. -
edit_timetable— edit a timetable timeslot in the person -
download_timetable— downloads a timetable into a csv file into a stored folder location from the person.
These operations are handled by the logic component and uses the person in model to do the execution.
Given below is an activity diagram.
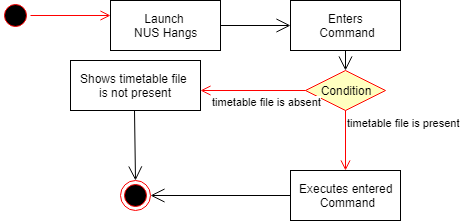
Given below is an example usage scenario and how the add_timetable behaves at each step.
Step 1: The user launches the application for the first time. The NUS Hangs will initialise the person with the timetable with the details which was stored using Storage.
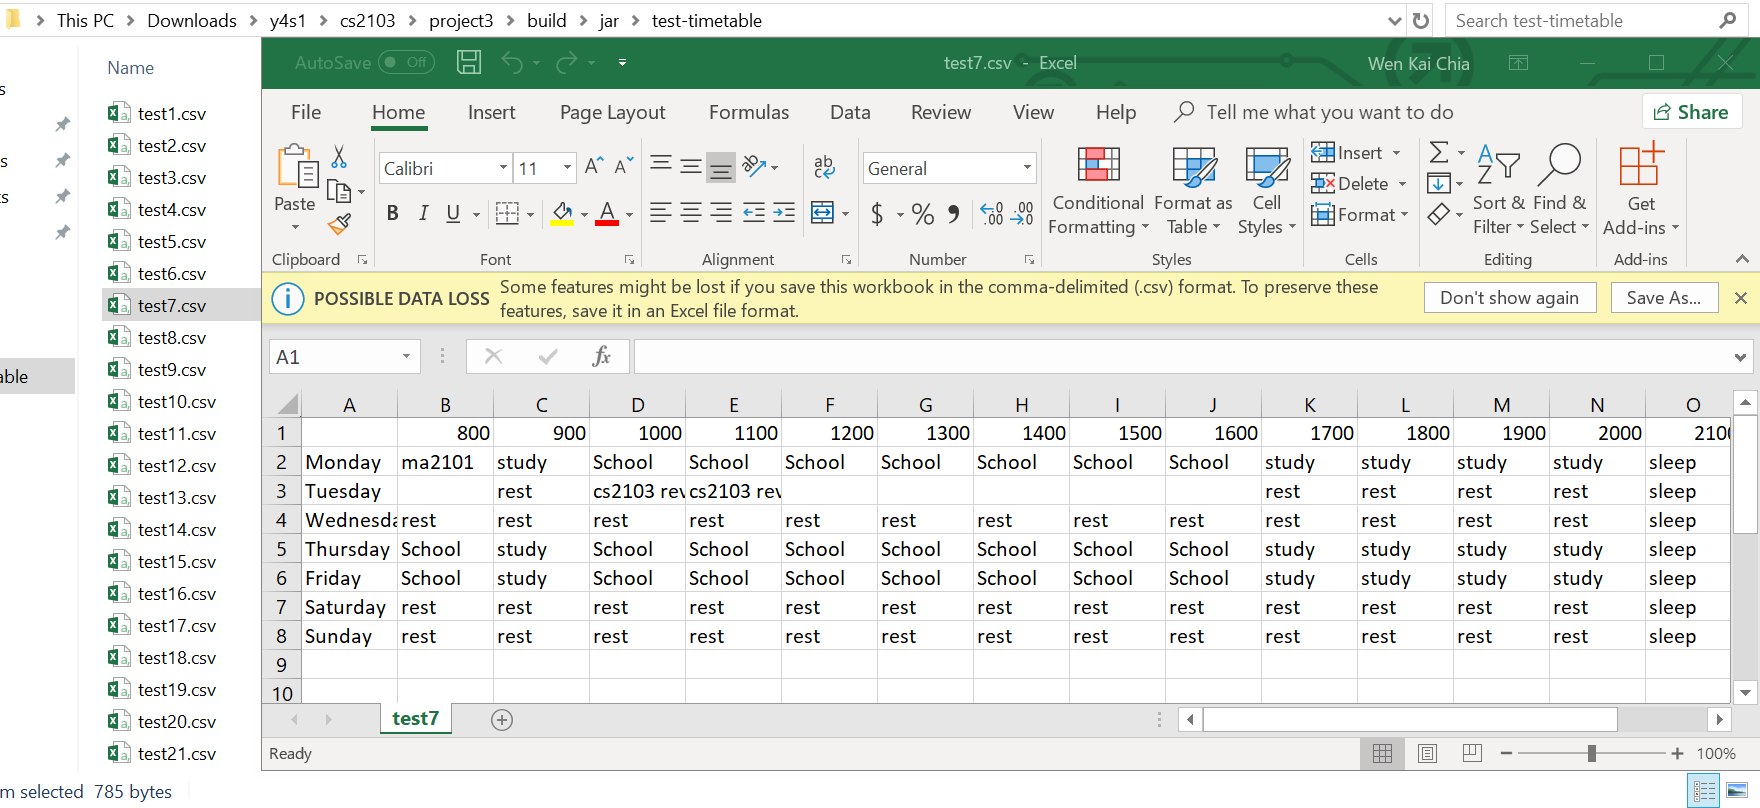
Step 2: user finds a timetable of first person in the stored location which is called test7.csv. Using this command, User does not need to type in the timetable name. As shown in the diagram below its easy to see what event the person has.
Step 3: The user executes add_timetable 1 to add the timetable of first person in stored folder to NUS hangs. A new timetable will be created containing the data of the timetable of first person in stored folder. The timetable of first person will be replaced by this new timetable.
The timetable is then added to storage as a String which contains all of the data. This is to allow the app to save time in storage.
The following sequence diagram shows how add_timetable works.

3.1.4. Design Considerations
-
Alternative 1 : adds the timetable via a csv file.
-
Pros: Easier for user to visualise and edit his timetable
-
Cons: Hard to implement. No choice other than to edit his timetable from the stored folder defined.
-
-
Alternative 2 (current choice) : adds the timetable via a csv file from other locations.
-
Pros: Easier for user to visualise and edit his timetable and allows user a choice on where to edit his timetable.
-
Cons: Hard to implement, and user has to know how to get file location of a file.
-
-
Alternative 3: adds the timetable edit by editing the xml file of the person.
-
Pros: Easier to implement
-
Cons: User must know how to edit via the xml file of the person, and harder for User to visualise.
-
Aspect: Data structure to support the add_timetable commands
-
Alternative 1 (current choice): Use a String [][] Matrix to store entries of the timetable.
-
Pros: Easy for new Computer Science student undergraduates to understand, who are likely to be the new incoming developers of our project. Better intuition to access entries of the matrix (matrix[i][j]) Which makes
edit_timetableeasier to implement. -
Cons: Slower Time efficiency because using 2 for loops to fill the Matrix with the data. Unable to use functions in ArrayList.
-
-
Alternative 2: Use ArrayList<ArrayList<String>>
-
Pros: Faster Time efficiency because using 1 for loops to fill the Matrix with the data. Able to use functions in ArrayList
-
Cons: Harder for new Computer Science student undergraduates to understand, who are likely to be the new incoming developers of our project. Less intuition to access entries of the matrix (matrix.get(i).get(j)).
-
3.2. Security Mechanism
3.2.1. Reason for Implementation
In a typical interest group setting, there are two main stakeholders. The (1) committee members whom organizes events and the (2) group members whom participates in the event. In this context, these two stakeholders are the main users of NUS Hangs.
The security mechanism is implemented on the following premises:
-
The application is used by the interest group on a shared computer
-
The application is offline
-
Only the two stakeholders mentioned have access to the shared computer
Based on the above premises, the main objectives of the security mechanism include:
-
Restrict group members to read-only commands
-
Only committee members can add and edit information stored in the application
The following activity diagram illustrates the workflow involving security mechanism.
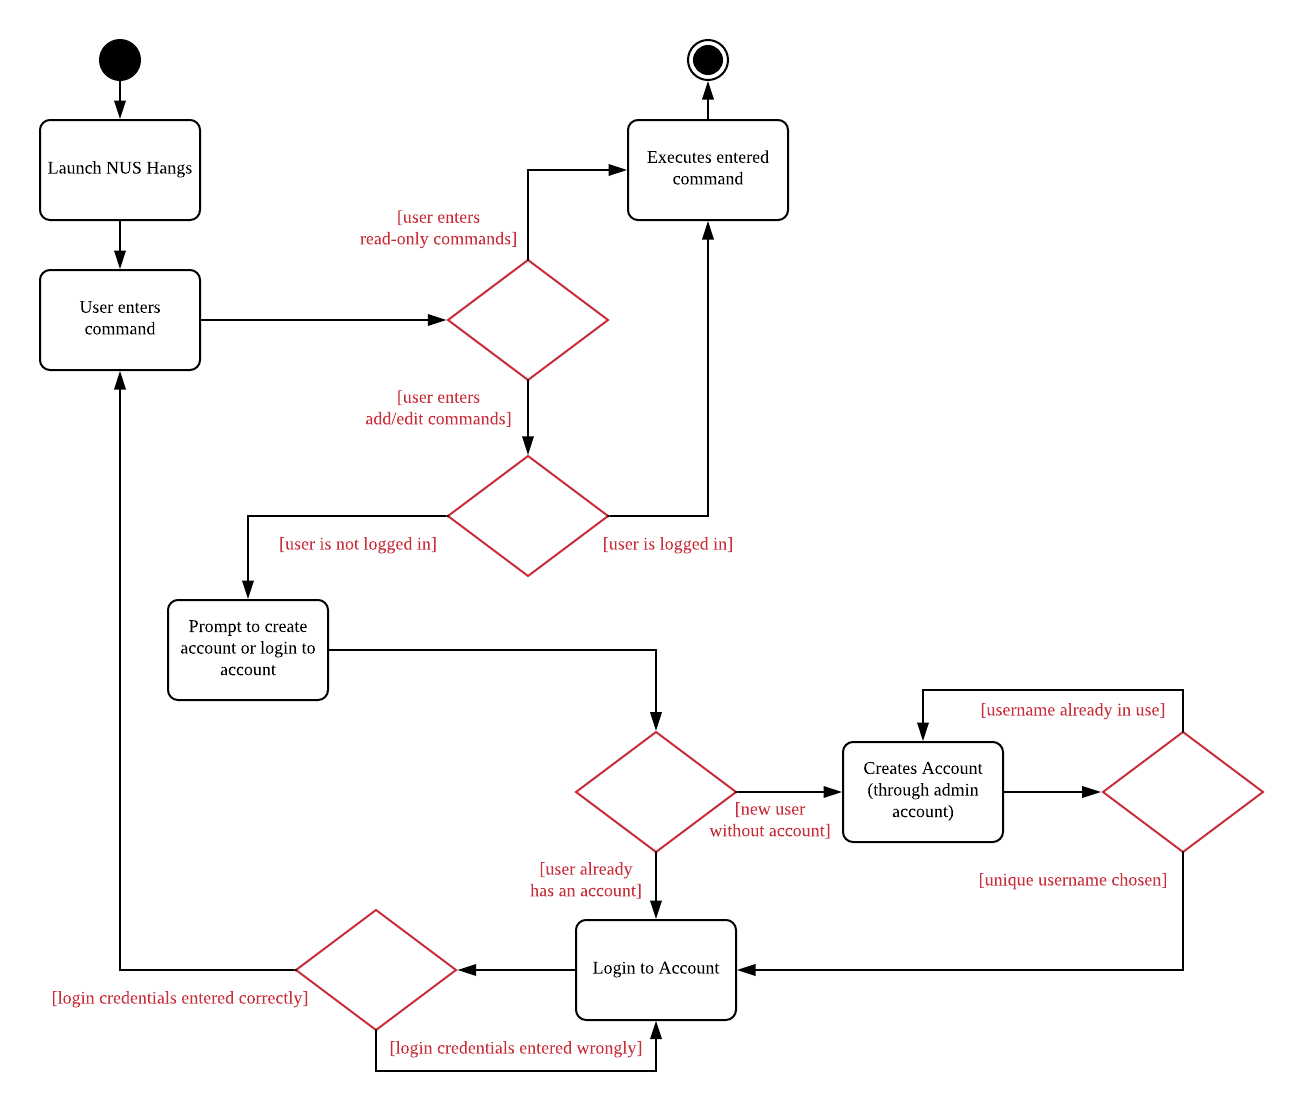
The three main components that works together to achieve this workflow are:
-
Account creation
-
Account login
-
Validation of login status prior to executing functions
3.2.2. Current Implementation
Account Creation
The first thing a new user must do is to create a new account. To prevent unauthorized members from creating an account, the create command can only be executed if the user is logged in. A default admin account is provided (username: admin, password: adminPassword) to allow the committee members to create their first account.
The following sequence diagram illustrates the interactions between the different classes in the process of creating an account.
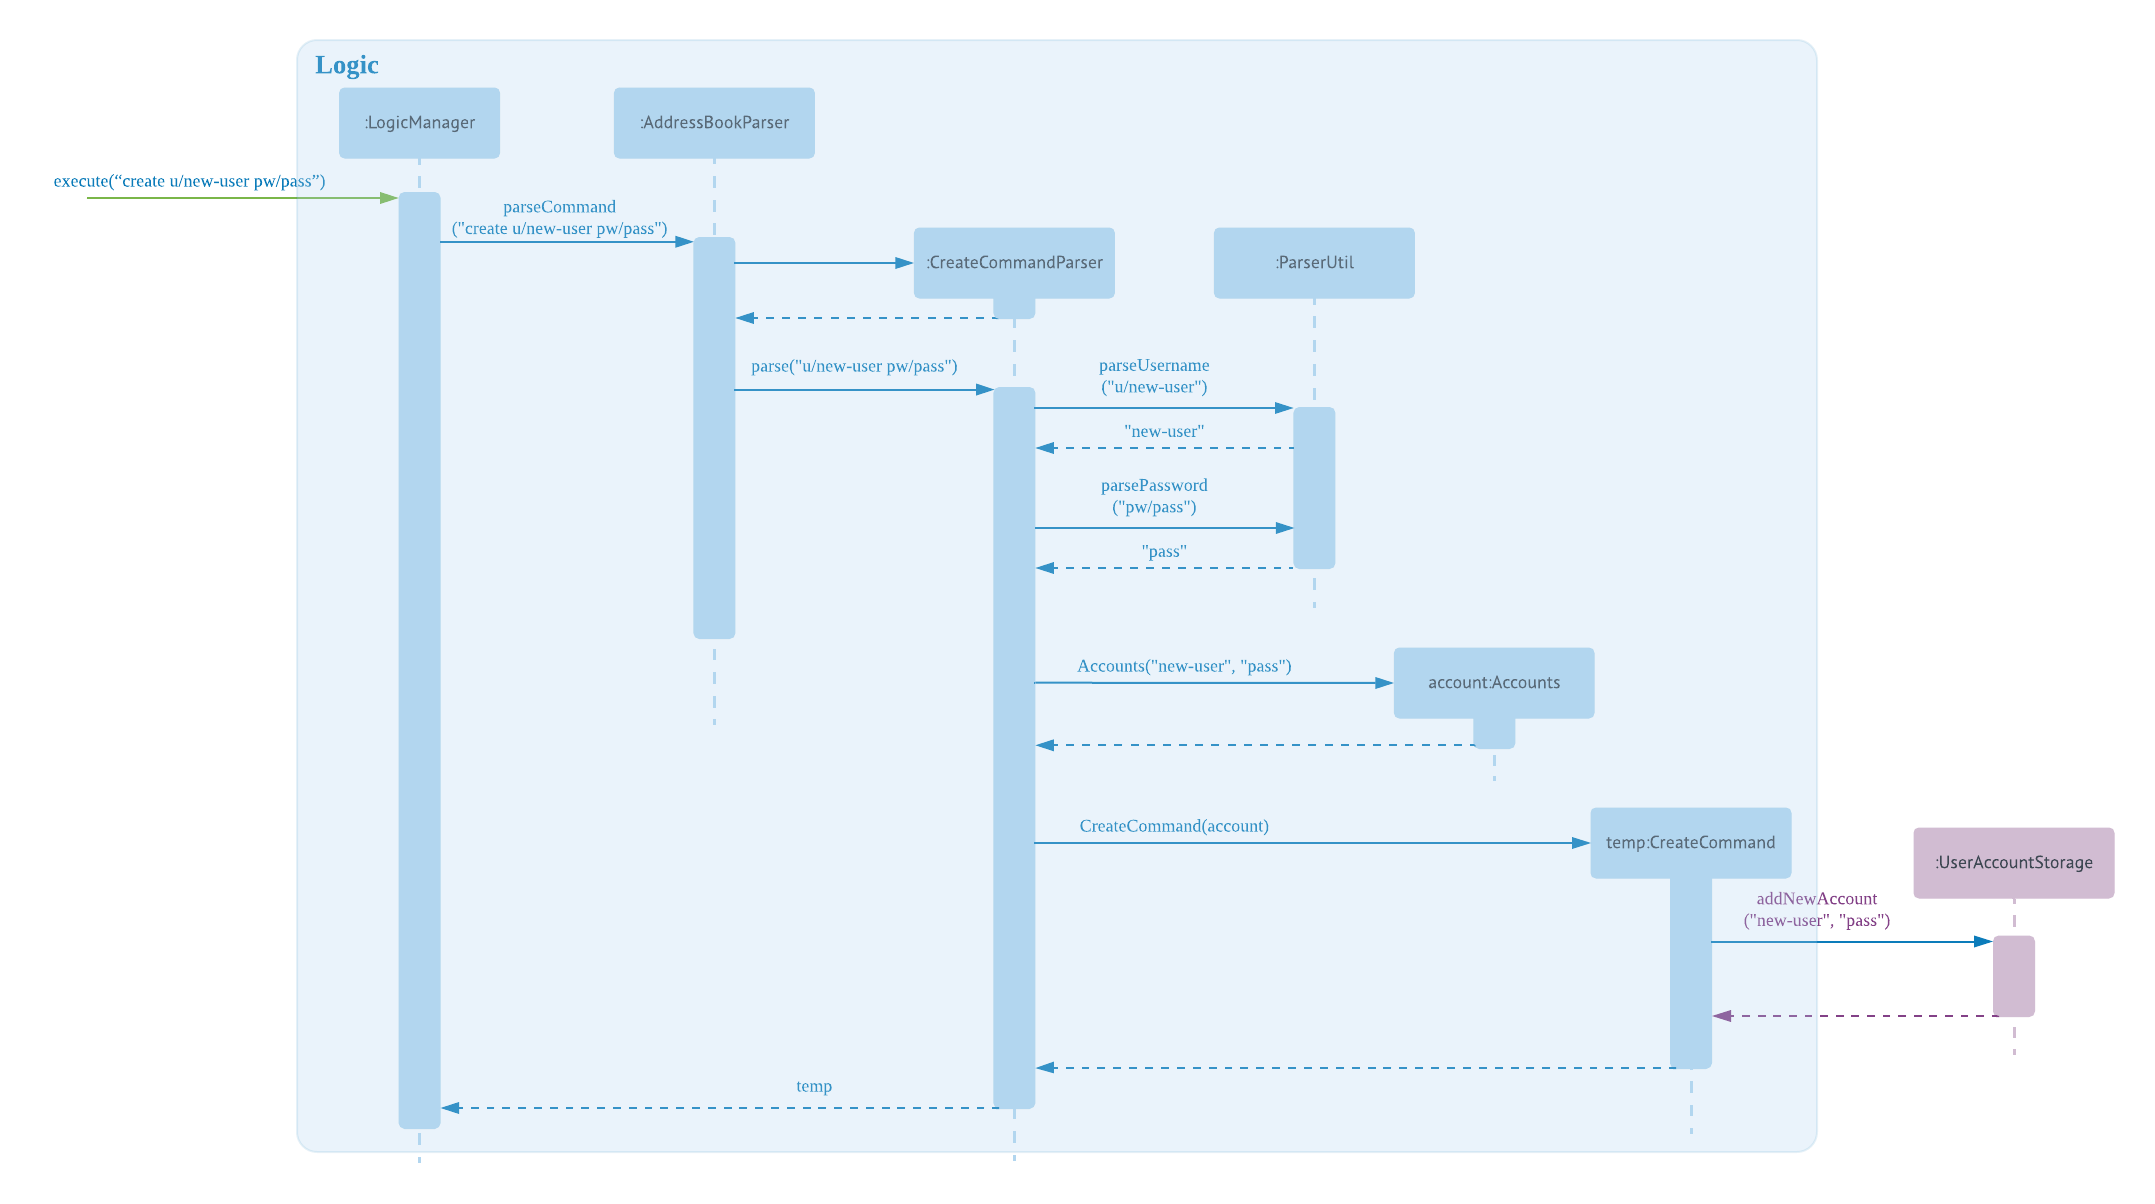
There are four new classes that are added to AddressBook4 in the implementation of account creation:
-
CreateCommandParser: parses input arguments and creates a new CreateCommand object
-
CreateCommand: creates a new account for NUS Hangs
-
Accounts: represents an account with username and password fields
-
UserAccountStorage: storage of account credentials in a hashmap
Minor extensions are added to the other existing classes in AddressBook4:
-
AddressBookParser: added the create command keyword for parsing
-
ParserUtil: added functions to parse username and password
Login Account
The following sequence diagram illustrates the interactions between the different classes in the process of logging in to an account. Upon successful login, LoginCommand changes the flag in AddressBookParser to allow users to execute add/edit commands on top of read-only commands.
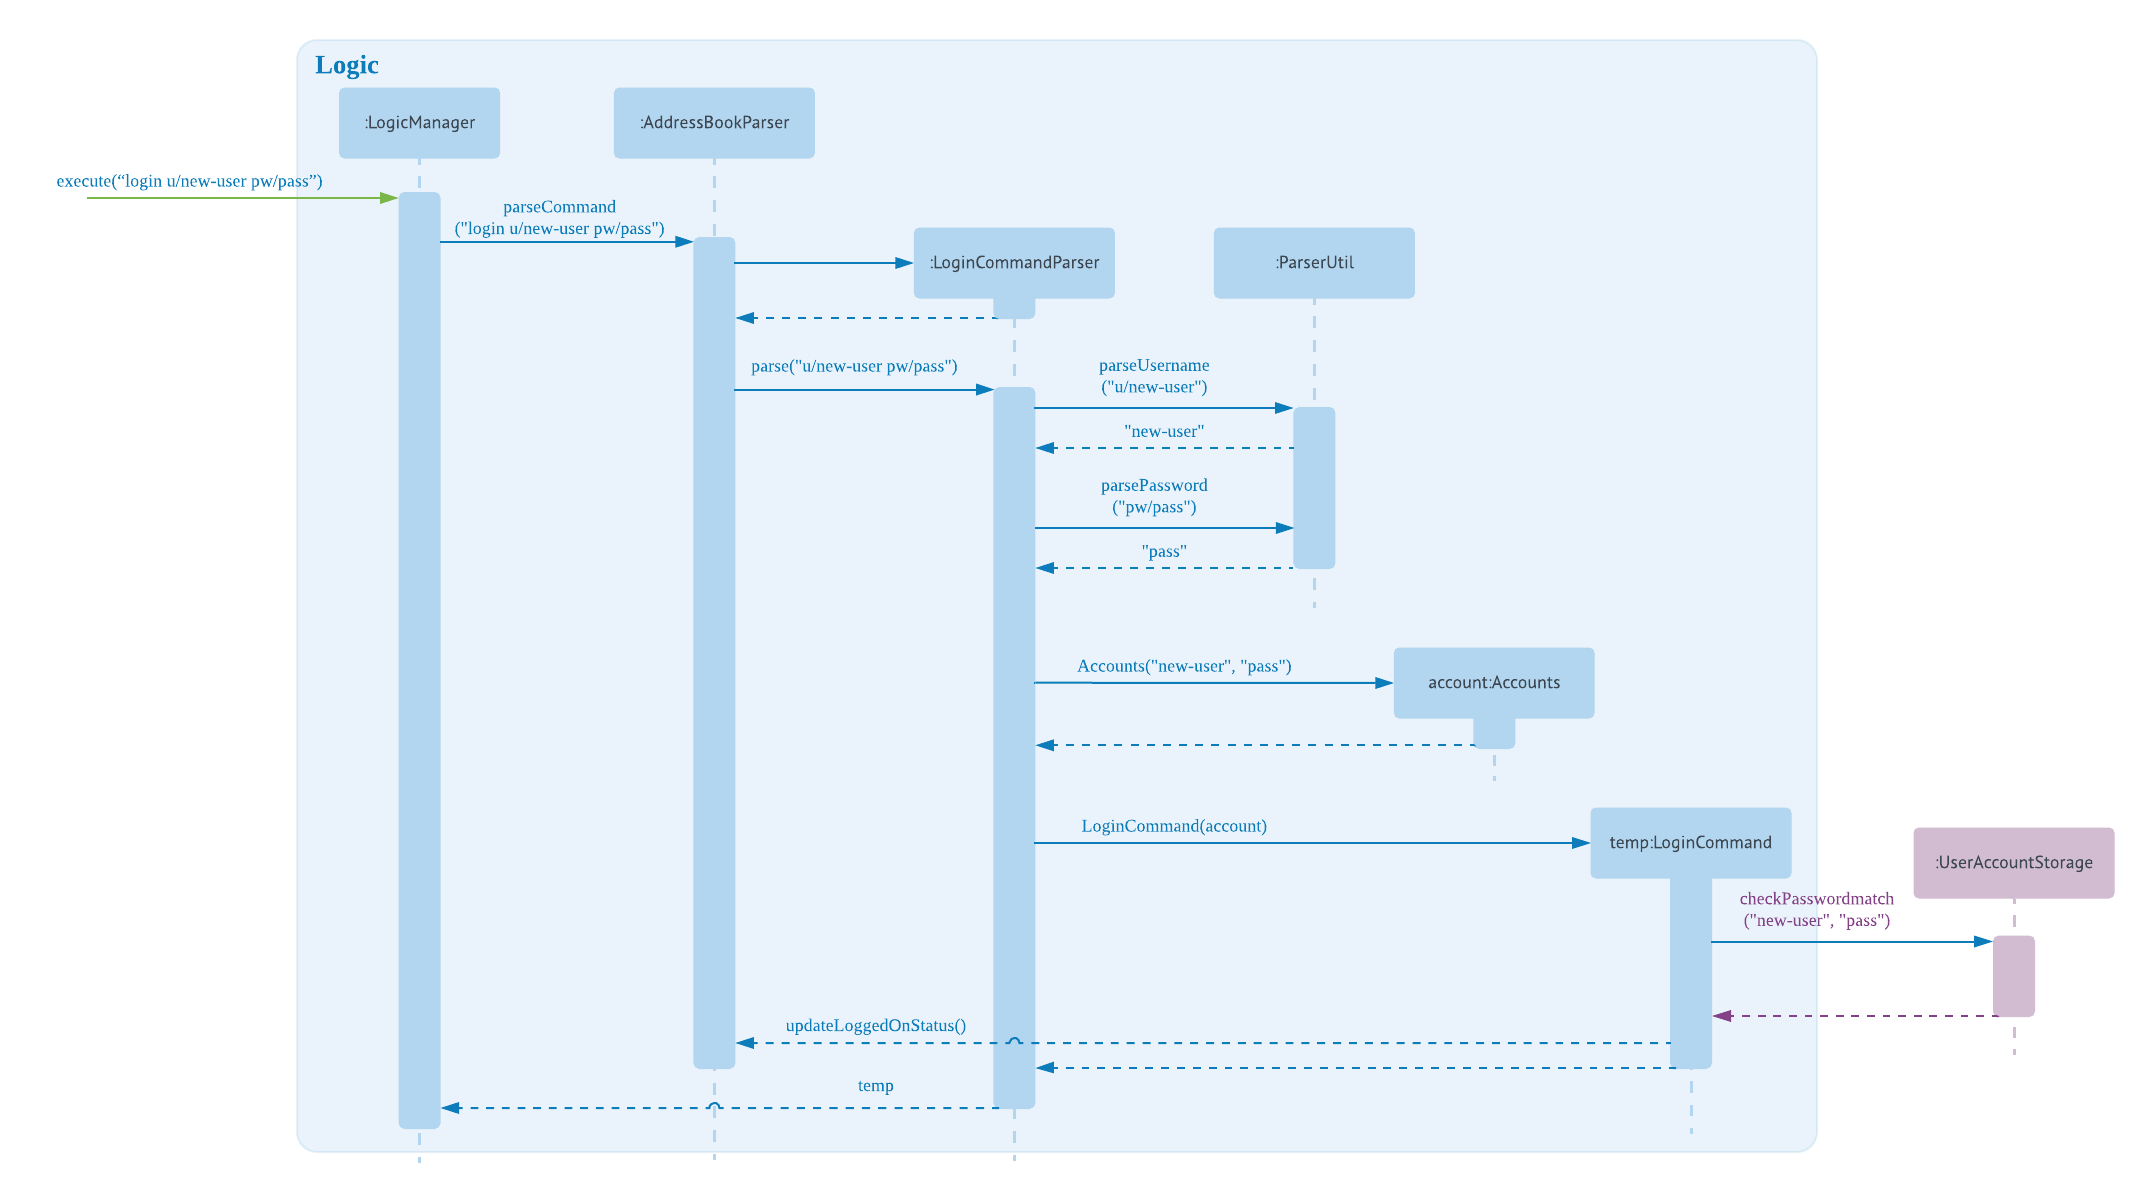
There are four new classes that are added to AddressBook4 in the implementation of account login:
-
LoginCommandParser: parses input arguments and creates a new LoginCommand object
-
LoginCommand: login to an account of NUS Hangs
-
Accounts: represents an account with username and password fields
-
UserAccountStorage: retrieval and checking of account credentials in a hashmap
Minor extensions are added to the other existing classes in AddressBook4:
-
AddressBookParser: added the login command keyword for parsing, added a check on login status to control commands execution
-
ParserUtil: added functions to parse username and password
3.2.3. Design Considerations
Aspect: Implementation of UserAccountStorage
Alternative 1 (current choice): Storing account credentials in a HashMap
Pros: HashMap is one of the simplest data structures to make use of. It’s especially useful since it maps values to keys. In this case, username serves as keys while the passwords serve as values to be stored in the hashmap.
Cons: By default, adding a duplicate key would overwrite the initial value. i.e. if a username is already used, the password would be changed. To prevent this, we need to implement a function to check for duplicate username before adding the account credentials.
Alternative 2: Storing account credentials in a LinkedHashMap
Pros: captures the order of account creation
Cons: LinkedHashMaps is implemented by maintaining a doubly-linked list running through all entries to capture the order. This additional data structure results in additional memory usage.
Aspect: Implementation of Encrypt
Alternative 1(current choice): SHA-256
Pros: SHA-256 is a one-way hashing algorithm. This means that it is not feasible to invert which prevents unauthorized users from getting the plain text passwords. In version 1.4, NUS Hangs is an offline application situated on a single shared computer. Hence, a simple hash function is adequate in preventing unauthorized users from retrieving the passwords from the application.
Cons: Shorter hash outputs makes it easier to brute force.
Alternative 2: SHA-512 + Salting
Pros: Longer hash output that is less predictable protects it from rainbow table attacks.
Cons: Uses more memory space to store the longer hash output.
Aspect: Validation of Login Status
Alternative 1 (current choice): Login Status Flag implemented directly in AddressBookParser
Pros: This allows for simple implementation to control commands rights
Cons: As the amount of commands increases, this might become difficult to maintain.
Alternative 2: Creating two different parsers for read-only commands and add/edit commands
Pros: Easier to maintain as the amount of commands increases
Cons: Requires significant changes to the current architecture.
3.2.4. Limitations (version 1.4)
Account Credentials does not persist
Account credentials are stored in a hashmap. The problem with the current storage of account credentials is the lack of persistence, i.e. when the user closes the application, the account credentials are lost. In the future version, this problem will be solved either by storing credentials in an external file (such as .xml, .txt) or in a database.
No restrictions on password
There are no restrictions on password, namely there is no checks to ensure that the passwords are strong. This means that users can use weak passwords or even leave the password field empty to make it easy to log in.
3.3. Group Feature
The Group class extends the Entity abstract class just like a Person class does. An Entity contains an abstract method isSame that is necessary for the class to be used in UniqueList<T extends Entity>. Group class is an immutable class that is contained inside Model.
As shown in the diagram below, group and person classes are associated. Each group contains a UniqueList<Person>, a list of its members. Likewise, each person contains a UniqueList<Group>, a list of all groups he is in. Due to these mutual association, commands editing/deleting instances of group or person may have to edit the corresponding member/group lists respectively. (Refer to DeleteGroupCommand example below.)

Group features make use of Storage to load information on groups added by the user before the UI is closed. XmlAdaptedGroup class helps the convert groups detail from xml files to the AddressBook when MainApp starts and similarly convert Group objects into xml files.
Group features also updates the Group Panel inside the UI using a predicate.
3.3.1. Current Implementation
The current group commands added are:
-
add_group/ag— adds a group with an optional description -
delete_group/dg— deletes a group and all references from its members to it -
edit_group/eg— edit name/description of a group while maintaining uniqueness of all group names -
find_group/fg— search for groups using keywords that must match exactly a word in Group name -
register/r— register a member into an existing group and include a reference to the group in the member (Person class) -
delete_member/dm— delete an existing member from an existing group and remove reference to that group in the member -
view_group/vg— view the existing members in the group and is updated whenever any member is added or deleted. -
list [person_index]/l [person_index]— lists all the groups the person at[person_index]is currently in.
These functions and their parsers are handled in Logic, before updating Model and Storage and displaying the updated result on the UI.
3.3.2. An Example: DeleteGroupCommand
The DeleteGroupCommand is a good example of how Group and Person classes are interacting (dependent and associated with each other). An example usage scenario of how delete_group behaves at each stop is explained below.
Step 1: The user launches the application. (We assume that the user has already added a group and person.) VersionedAddressBook will be loaded with the final addressbook state before the application was closed. Lists of groups and persons added previously will be loaded from addressbook.xml file into Model using XmlAdaptedPerson and XmlAdaptedGroup classes. Updated lists will be displayed in the UI.
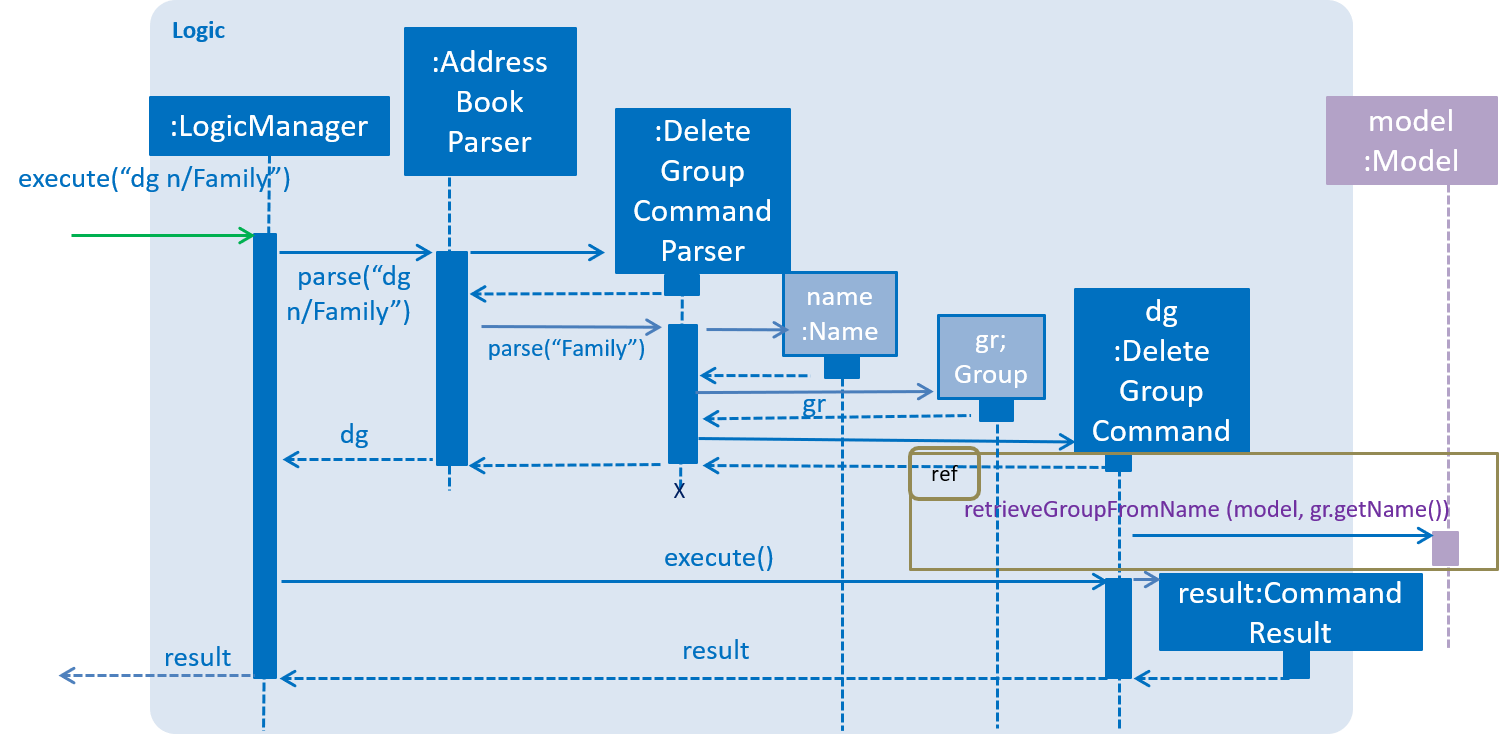
Step 2: The user enters the command dg n/Family to delete the existing group with group name Family.
-
The
LogicManagerclass parses the command toAddressBookParser.AddressBookParsercreates aDeleteGroupCommandParserinstance which parses the String "Family" into aNamename. The parser creates aGroupgr with the name (Family). This group is needed for the function below. -
The parser creates a
DeleteGroupCommandobject with parameters gr. Subsequently,retrieveGroupFromName(m, gr.getName())is called to the Model component in order to retrieve the actual group with the name "Family".
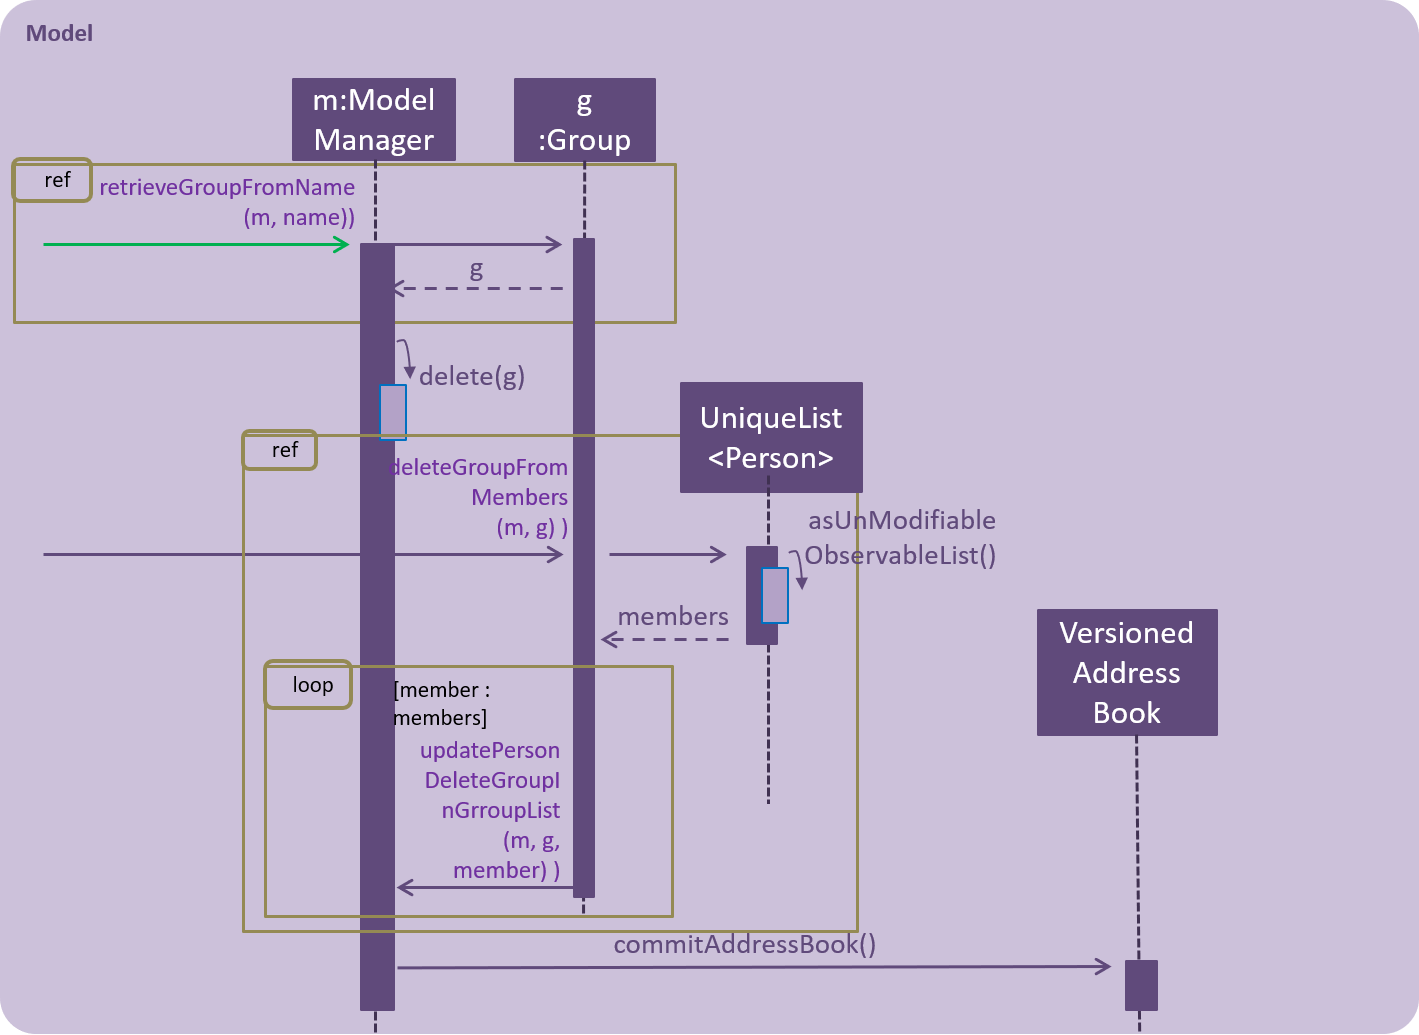
-
After retrieving the actual group
gwith name "Family" from Modelm, the model performs deletion of the group using an internal functiondelete(g). -
However, the group still has to be deleted from the groupList from all of its members. (Refer to GroupPersonClassDiagram above.)
deleteGroupFromMembers(m, g)is called from DeleteGroupCommand object to do so. This method calls theUnModifiableObservableList()method in its UniqueList<Person> to return a list ofmembersing. For everymemberin the list ofmembers(for loop),updatePersonDeleteGroupFromGroupList(m, g, member)deletes the reference toginmember. -
Finally, the address book is committed with all the changes.
Step 4: FilteredPersonList and FilteredGroupList is also updated correspondingly to display the new groups and persons in the UI. A successful message is also displayed to the user below the UI’s command box.
Step 5: Before the application is closed, all groups and persons are stored in addressbook.xml using XmlAdaptedGroup and XmlAdaptedPerson classes. (Refer to High level sequence diagrams Figure 3 and 4 for a similar illustration of the concept.)
3.3.3. Design Considerations
Aspect: How to implement Group class
Alternative 1 (current choice): Group as an immutable class.
Pros: Immutable objects are good Map keys and Set elements, since these typically do not change once created. Immutability makes it easier to write, use and reason about the code.
Cons: Doing so might restrict the way one can call the class and its methods. It may be slower as you have to create new objects with every command.
Alternative 2: Setter methods for Groups
Pros: Easier and less code for methods involving groups. Faster as do not have to create new objects each time you change a Group (e.g. edit its description or group members).
Cons: Miss out on the advantages of immutable object (above). Good practice to use immutable objects.
Aspect: Interactions between person and groups
Deleting a person from a group will affect the person’s reference to that group and vice versa (similar for adding and editing).
Alternative 1 (current choice): Having a UniqueList<Groups> in Person and UniqueList<Person> in Group.
Pros: Easy to retrieve groups from Person and persons from Group. Existing UniqueList class available (since already used in Model).
Cons: Have to update both lists in most group commands (e.g. registering a new member in a group). Issue of enforcing referential integrity - defensive programming.
Alternative 2 Just update the list of groups in Model and have person refer to that list of group as to whether it is a member of the group.
Pros: Less issues with enforcing referential integrity (see alternative 1).
Cons: Can be more expensive to look for groups for a particular person.
3.4. Person Feature
The 'Person' class extends the Entity abstract class and it is contained within Model.
Person feature make use of Timetable and Group class to assign respective information to each instance of a person.
3.4.1. Current Implementation
The current person implementation are:
-
add— add any person with the choice of adding address, phone, email and tags -
find— finds all persons in NUSHangs, whose contain keywords provided by prefix(es)
3.4.2. Reasons for Implementation
The ability to add and find members with flexibility improves the user’s experience of the application.
The add command allows users to include or omit particulars of any member.
-
This is helpful as the user may not always have all of the particulars of its members.
-
This also promotes flexibility as to how users want to control the information, which can be useful for organising events.
The find command allows users to find members based on certain particulars.
-
This is useful for interest groups as they can find members based on certain particulars.
-
For example, organisers can find and group users by level of proficiency to perform an event; or
-
The organisers can find based on address to get people who stays close to school to reach earlier to perform certain setup
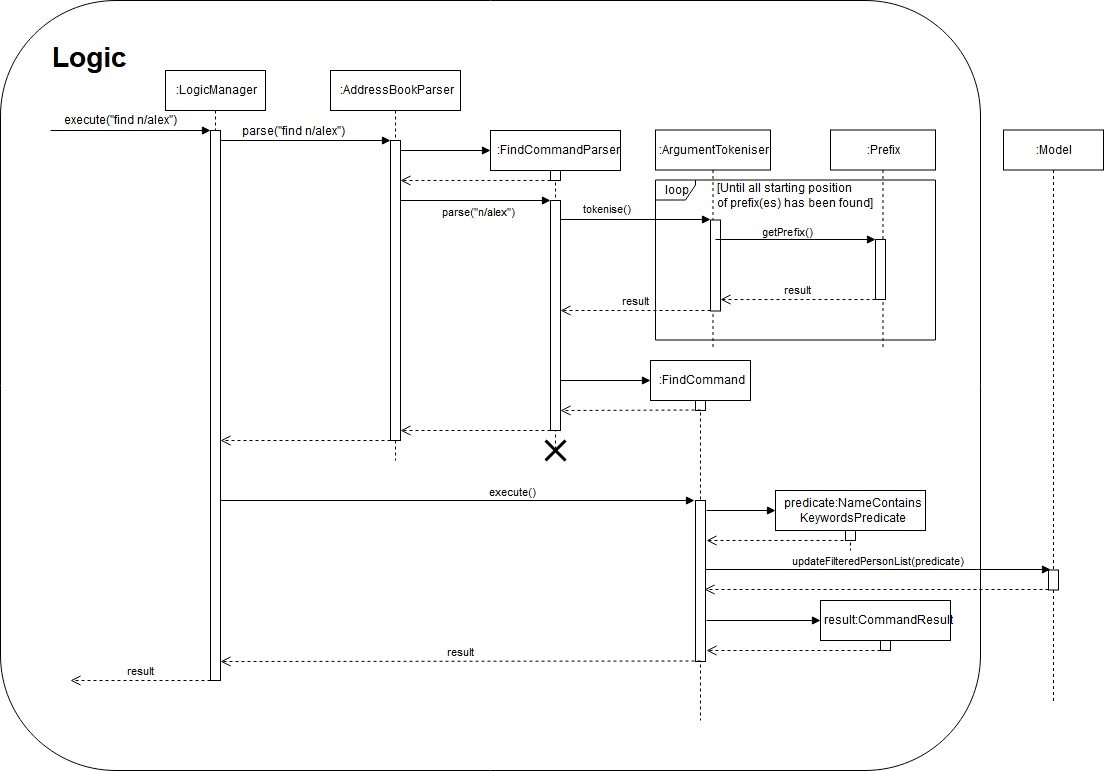
3.4.3. Activity & Sequence Diagram: An example to FindCommand
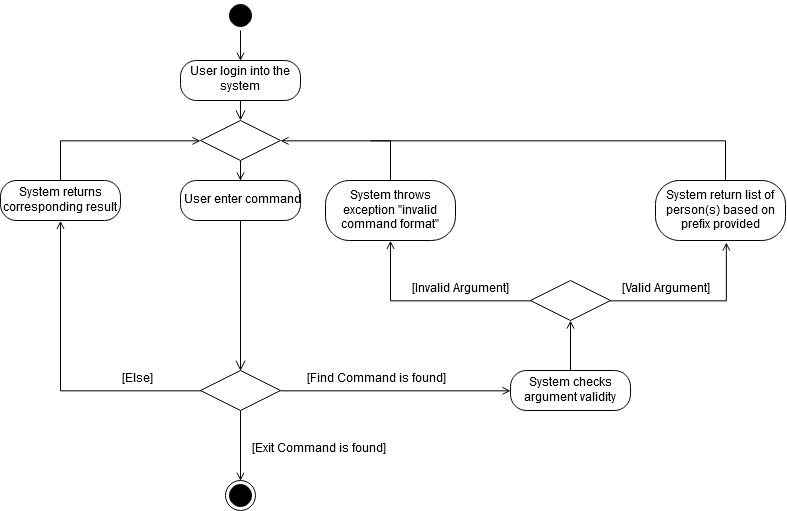
Given below is the Sequence Diagram for interactions within the Logic component for the - execute("find n/alex") API call.
The following activity diagram shows how 'find' feature works:
3.4.4. Design Considerations
Aspect: How should each specific find feature work
Alternative 1 (Current Choice) : Use prefixes for specific search (e.g. find n/alex bernice t/friends)
Pros: Higher flexibility. Greater control of search range.
Cons: Harder to implement.
Alternative 2 : Create a class for each information (e.g. find_address)
Pros: Easy to implement, with specific search focus.
Cons: Repetitive code base with less flexibility.
Aspect: How should add feature work
Alternative 1 (Current Choice) : Allow optional prefix (e.g. add n/alex t/friends)
Pros: Higher flexibility. Allow users to gain greater control over particulars.
Cons: Harder to implement.
Alternative 2 : Only name input is required (e.g. add alex)
Pros: Simple command for users.
Cons: Unable to utilize or classify information when needed.
3.5. Time slot Feature
The time slot feature makes use of the Timetable and Group classes each Person class is associated with to find the common time slots within the members of a group for easier planning of events and outings.
3.5.1. Current Implementation
The current time slot commands added are:
-
view_slots_all/va— lists all time slots at which every member of a specfied group is free at -
view_slots_ranked/vr— sorts and lists all time slots in terms of number of members available, for a specified group and specified required minimum number of people
The activity diagram is as follows.
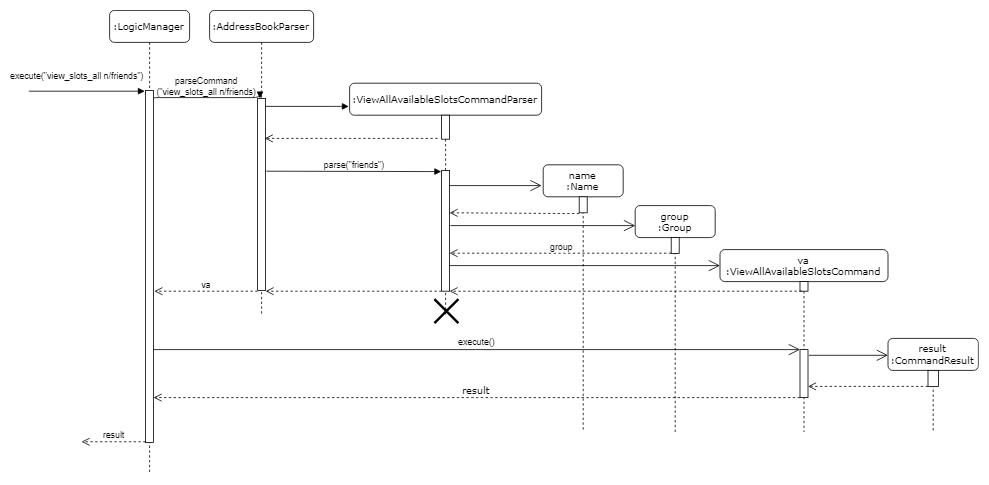
These methods and their parsers are handled in Logic, and compares the Timetable associated with each Person in a specified Group during execution. Given below is the Sequence Diagram illustrating the interactions between the various classes when finding the aforementioned slots.
3.5.2. Design Considerations
Aspect: How should time tables be compared when view_slots_all is executed
-
Alternative 1 (current choice): Get a 2d boolean array based on the 2d string array data in the
Timetableassociated with eachPersonto determine if thePersonis free at a particular time slot.
Pros: The true/false nature of a 2d boolean array is intuitive when determining if a person is free. No strings have to be parsed during the method call, which allows for faster comparisons.
Cons: It will be harder to implement additional features based on the 2d boolean array as its entries can only be true or false.
-
Alternative 2: Directly compare the 2d string array of the
Timetableclass associcated with eachPerson
Pros: Less code needed and debugging would be easier. Furthermore, implementation would also be more direct.
Cons: If there are many Person in a group, it will take a longer time to find the available slots as every string entry in the 2d string array has to be parsed to check if the Person is free at a particular time slot.
Aspect: How should time slots be sorted when view_slots_ranked is executed
-
Alternative 1 (current choice): Store the available time slots in a treemap with the key being the slots in integer form, and the value being the number of people available at the that slot.
Pros: Very fast and can be easily sorted in terms of number of people available using a custom comparator while collecting the elements in a linkedhashmap. This preserves the order of the elements so that they are first sorted in number of people available and then in terms of timing. While iterating through the linkedhashmap, it can return immediately when a slot has less people available than required.
Cons: Complex implementation as it requires the use of lambda functions, streams and various data structures.
-
Alternative 2: Store the available time slots with its corresponding number of people available in an arraylist as an integerdouble and sorting at the end with collections.sort and a custom comparator.
Pros: Very easy to implement.
Cons: Very slow due to O(n) find and deletion.
Aspect: How should the results be returned
-
Alternative 1 (current choice): Return the results in a form of a string
Pros: Relatively fast due to stringbuilder and easy to implement.
Cons: Harder to use and manipulate the results for implementation of other features.
-
Alternative 2: Return the results in a form of a
Timetable
Pros: Can be used in various ways due to the available timetable methods and can also be downloaded as an excel file.
Cons: Harder to implement and debug.
4. Documentation
We use asciidoc for writing documentation.
| We chose asciidoc over Markdown because asciidoc, although a bit more complex than Markdown, provides more flexibility in formatting. |
4.1. Editing Documentation
See UsingGradle.adoc to learn how to render .adoc files locally to preview the end result of your edits.
Alternatively, you can download the AsciiDoc plugin for IntelliJ, which allows you to preview the changes you have made to your .adoc files in real-time.
4.2. Publishing Documentation
See UsingTravis.adoc to learn how to deploy GitHub Pages using Travis.
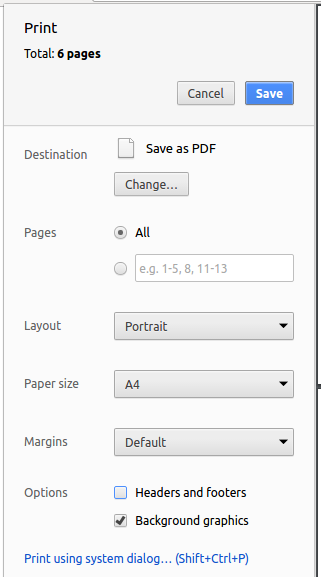
4.3. Converting Documentation to PDF format
We use Google Chrome for converting documentation to PDF format, as Chrome’s PDF engine preserves hyperlinks used in webpages.
Here are the steps to convert the project documentation files to PDF format.
-
Follow the instructions in UsingGradle.adoc to convert the AsciiDoc files in the
docs/directory to HTML format. -
Go to your generated HTML files in the
build/docsfolder, right click on them and selectOpen with→Google Chrome. -
Within Chrome, click on the
Printoption in Chrome’s menu. -
Set the destination to
Save as PDF, then clickSaveto save a copy of the file in PDF format. For best results, use the settings indicated in the screenshot below.
4.4. Site-wide Documentation Settings
The build.gradle file specifies some project-specific asciidoc attributes which affects how all documentation files within this project are rendered.
Attributes left unset in the build.gradle file will use their default value, if any.
|
| Attribute name | Description | Default value |
|---|---|---|
|
The name of the website. If set, the name will be displayed near the top of the page. |
not set |
|
URL to the site’s repository on GitHub. Setting this will add a "View on GitHub" link in the navigation bar. |
not set |
|
Define this attribute if the project is an official SE-EDU project. This will render the SE-EDU navigation bar at the top of the page, and add some SE-EDU-specific navigation items. |
not set |
4.5. Per-file Documentation Settings
Each .adoc file may also specify some file-specific asciidoc attributes which affects how the file is rendered.
Asciidoctor’s built-in attributes may be specified and used as well.
Attributes left unset in .adoc files will use their default value, if any.
|
| Attribute name | Description | Default value |
|---|---|---|
|
Site section that the document belongs to.
This will cause the associated item in the navigation bar to be highlighted.
One of: * Official SE-EDU projects only |
not set |
|
Set this attribute to remove the site navigation bar. |
not set |
4.6. Site Template
The files in docs/stylesheets are the CSS stylesheets of the site.
You can modify them to change some properties of the site’s design.
The files in docs/templates controls the rendering of .adoc files into HTML5.
These template files are written in a mixture of Ruby and Slim.
|
Modifying the template files in |
5. Testing
5.1. Running Tests
There are three ways to run tests.
| The most reliable way to run tests is the 3rd one. The first two methods might fail some GUI tests due to platform/resolution-specific idiosyncrasies. |
Method 1: Using IntelliJ JUnit test runner
-
To run all tests, right-click on the
src/test/javafolder and chooseRun 'All Tests' -
To run a subset of tests, you can right-click on a test package, test class, or a test and choose
Run 'ABC'
Method 2: Using Gradle
-
Open a console and run the command
gradlew clean allTests(Mac/Linux:./gradlew clean allTests)
| See UsingGradle.adoc for more info on how to run tests using Gradle. |
Method 3: Using Gradle (headless)
Thanks to the TestFX library we use, our GUI tests can be run in the headless mode. In the headless mode, GUI tests do not show up on the screen. That means the developer can do other things on the Computer while the tests are running.
To run tests in headless mode, open a console and run the command gradlew clean headless allTests (Mac/Linux: ./gradlew clean headless allTests)
5.2. Types of tests
We have two types of tests:
-
GUI Tests - These are tests involving the GUI. They include,
-
System Tests that test the entire App by simulating user actions on the GUI. These are in the
systemtestspackage. -
Unit tests that test the individual components. These are in
seedu.address.uipackage.
-
-
Non-GUI Tests - These are tests not involving the GUI. They include,
-
Unit tests targeting the lowest level methods/classes.
e.g.seedu.address.commons.StringUtilTest -
Integration tests that are checking the integration of multiple code units (those code units are assumed to be working).
e.g.seedu.address.storage.StorageManagerTest -
Hybrids of unit and integration tests. These test are checking multiple code units as well as how the are connected together.
e.g.seedu.address.logic.LogicManagerTest
-
5.3. Troubleshooting Testing
Problem: HelpWindowTest fails with a NullPointerException.
-
Reason: One of its dependencies,
HelpWindow.htmlinsrc/main/resources/docsis missing. -
Solution: Execute Gradle task
processResources.
6. Dev Ops
6.1. Build Automation
See UsingGradle.adoc to learn how to use Gradle for build automation.
6.2. Continuous Integration
We use Travis CI and AppVeyor to perform Continuous Integration on our projects. See UsingTravis.adoc and UsingAppVeyor.adoc for more details.
6.3. Coverage Reporting
We use Coveralls to track the code coverage of our projects. See UsingCoveralls.adoc for more details.
6.4. Documentation Previews
When a pull request has changes to asciidoc files, you can use Netlify to see a preview of how the HTML version of those asciidoc files will look like when the pull request is merged. See UsingNetlify.adoc for more details.
6.5. Making a Release
Here are the steps to create a new release.
-
Update the version number in
MainApp.java. -
Generate a JAR file using Gradle.
-
Tag the repo with the version number. e.g.
v0.1 -
Create a new release using GitHub and upload the JAR file you created.
6.6. Managing Dependencies
A project often depends on third-party libraries. For example, Address Book depends on the Jackson library for XML parsing. Managing these dependencies can be automated using Gradle. For example, Gradle can download the dependencies automatically, which is better than these alternatives.
a. Include those libraries in the repo (this bloats the repo size)
b. Require developers to download those libraries manually (this creates extra work for developers)
eryone in the address book, but the model API does not support such a functionality at the moment. Your job is to implement an API method, so that your teammate can use your API to implement his command.
Do take a look at Section 2.4, “Model component” before attempting to modify the Model component.
|
Appendix A: Product Scope
Target user profile:
-
Small to medium scale interest groups in NUS
-
Groups who find organising a common / least conflicted dtime slot to meet a hassle
Value proposition: Automate the process of organising meetings and finding least conflicted time slot for the group in a way faster than manually checking everyone’s timetables.
Appendix B: User Stories
Priorities: High (must have) - * * *, Medium (nice to have) - * *, Low (unlikely to have) - *
| Priority | As a … | I want to … | So that I can… |
|---|---|---|---|
|
new user |
see usage instructions |
refer to instructions when I forget how to use the App |
|
user |
add a new person |
add entries with details of person |
|
user |
delete a person |
remove entries that I no longer need |
|
user |
find a person by name |
locate details of persons without having to go through the entire list |
|
user |
hide timetable by default |
minimize chance of someone else seeing them by accident |
|
user |
Add my new Timetable |
I can plan for the week |
|
user |
Delete a timetable |
Remove the timetable i no longer need |
|
user |
View my timetable |
I can see when i am free for the week |
|
user |
Have standardised Date,time,time zone format |
I am clear on the meeting time and dates |
|
user |
view timetable in a format i am used to |
I can view my timetable faster |
|
user |
Upload my timetable In excel format |
I do not need to key in manually my timetable |
|
Organiser of the group |
See if there are any available time slots which are not in conflict with everyone’s time table. |
I can plan or attend an activity accordingly |
|
Organiser of the group |
See the time slot with the least number of conflicts if there are no time slots available for everyone |
I can ensure maximum participation if it is not possible for everyone to make it |
|
Organiser of the group |
See all of the time slots listed in order in terms of number of conflicts. |
I can pick the best slots if maximum participation isn’t required. |
|
Organiser of the group |
See the time slot with the least number of conflicts given a set of specific time slots. |
I can ensure maximum participation with the additional constraint |
|
member of a group |
Have a list of groups i am currently in |
I can remember what groups i am in |
|
Organiser of the group |
Be notified of each members’ changes in available time slot |
I can decide how and what to plan for the upcoming meeting |
|
Organiser of the group |
I want to dismiss members who are no longer affiliated to the group |
So that the time slot available is up to date, to ensure maximum participation |
|
Committee member of the Interest Group |
I want the password to be encrypted |
So that members are unable to retrieve the password from the application to gain unauthorised access. |
|
Committee member of the Interest Group |
I want the option to have an empty password |
the login process is faster |
{More to be added}
Appendix C: Use Cases
(For all use cases below, the System is the NUS Hangs and the Actor is the user, unless specified otherwise)
Use case: Help
MSS
-
User logins to System and prompts to add a timetable
-
System shows the help menu
Use case: Add a person into the system.
MSS
-
User logins to System and requests help to add a person
-
System shows him how to add a person
-
User input add command accordingly
-
System displays person is added successfully
Extensions
-
3a. User enters invalid input.
-
3a1.System shows an error message.
Use case resumes at step 2.
-
Use case: Find person by Name or other details (e.g. address/phone)
MSS
-
User logins to System and requests help to find a person
-
System shows how to find a person based on different details
-
User inputs command accordingly
-
System shows full person details
Extensions
-
3a. User enters invalid input.
-
3a1.System shows an error message.
Use case resumes at step 2.
-
-
4a.System cannot find person.
System reports 0 person listed.
Use case ends.
Use case: List all persons and groups.
MSS
-
User logins to System and requests help to list all person
-
User enters list command.
-
System shows a list of all persons and groups.
Use case: Delete a person
MSS
-
User logins to System and requests help to delete a person.
-
System shows how to delete a person.
-
User enters input accordingly.
-
System shows person is deleted successfully.
Extensions
-
3a. User enters invalid input or format.
-
3a1.System shows an error message.
Use case resumes at step 2.
-
-
4a. Index of person is not in the System (e.g. index larger than number of people in system).
-
4a1.System shows an error message: Invalid index entered.
Use case ends.
-
Use case: Edit a person.
MSS
-
User logins to System and requests help to edit a friend
-
System shows how to edit a person.
-
User enters input accordingly.
-
System shows person is edited successfully.
Extensions
-
3a. User enters invalid input.
-
3a1.System shows an error message.
Use case resumes at step 2.
-
-
4a. Person is not in the System (index inputted invalid or larger than number of people in system).
-
4a1.System shows an error message: Invalid index entered.
Use case ends.
-
Use case: List all groups a person is in.
MSS
-
User logins to System and requests help to list all groups a person is in.
-
System shows a list of all groups a friend is in.
Use case: Add a timetable
MSS
-
User logins to System and requests help to add a timetable
-
System shows how to add a timetable
-
User enters inputs accordingly
-
System shows his timetable and ask user for confirmation.
-
User confirms the addition of his timetable into the System.
-
System shows his timetable is added successfully.
Extensions
-
3a. User enters invalid input.
-
3a1.System shows an error message.
Use case resumes at step 2.
-
-
4a.User does not confirm the addition of the timetable into the System.
Use case ends
Use case: Edit a timetable
MSS
-
User logins to System and requests help to edit a timetable
-
System shows how to edit a timetable
-
User enters inputs accordingly
-
System shows his timetable and ask user for confirmation.
-
User confirms the edit of his timetable into the System.
-
System shows his timetable is edit successfully.
Extensions
-
3a. User enters invalid input.
-
3a1.System shows an error message.
Use case resumes at step 2.
-
-
4a.User does not confirm the addition of the timetable into the System.
Use case ends
Use case: Download a timetable
MSS
-
User logins to System and requests help to download a timetable
-
System shows how to download a timetable
-
User enters inputs accordingly
-
System shows his timetable and ask user for confirmation.
-
User confirms the download of the timetable.
-
System shows his timetable is edit successfully.
Extensions
-
3a. User enters invalid input.
-
3a1.System shows an error message.
Use case resumes at step 2.
-
-
4a.User does not confirm the download of the timetable
Use case ends
Use case: Delete a timetable
MSS
-
User logins to System and requests help to delete a timetable
-
System shows how to delete a timetable
-
User enters input accordingly
-
System asks user for confirmation.
-
User confirms his choice.
-
System shows the timetable is deleted successfully.
Extensions
-
3a. User enters invalid input.
-
3a1.System shows an error message.
Use case resumes at step 2.
-
-
5a. User does not confirm the deletion of the timetable
Use case ends.
Use case: Find time slots at which every member of a group is available
MSS
-
User requests help to see time slots at which everyone in the group is available
-
System shows how to find these time slots
-
User enters inputs accordingly
-
System lists all of these time slots in ascending order in terms of timing.
Extensions
-
3a. User enters invalid input.
-
3a1.System shows an error message.
Use case resumes at step 2.
-
-
4a. There are no members in the specified group
-
4a1.System indicates that there are no members in the specified group
Use case ends.
-
-
4b. There are no time slots at which every member of the specified group is available at.
-
4b1.System indicates that there are no available time slots. Use case ends.
-
Use case: Sort and list all time slots with a specified required minimum number of people available
MSS
-
User requests help to see a sorted list of time slots
-
System shows how to list all time slots in order in terms of number of people available of a specified group, with a specified required minimum number of people.
-
User enters inputs accordingly
-
System lists time slots that fits the requirement, in descending order in terms of number of people available, and then in ascending order in terms of timing.
Extensions
-
3a. User enters invalid input.
-
3a1.System shows an error message.
Use case resumes at step 2.
-
-
4a. There are no members in the specified group
-
4a1.System indicates that there are no members in the specified group
Use case ends.
-
-
4b. There are no time slots that meets the requirement.
-
4b1.System indicates that there are no available time slots. Use case ends.
-
Use case: Add a group
MSS
-
User logins to System and requests help to add a group
-
System shows how to add a group
-
User adds inputs accordingly
-
System shows group is created successfully
Extensions
-
3a. User enters invalid input or format.
-
3a1.System shows an error message.
Use case resumes at step 2.
-
-
3b. User enters a group name that already exists.
-
3b1. System shows an error message: Group already existed
Use case ends.
-
Use case: Find group by Name
MSS
-
User logins to System and requests help to find a group
-
System shows how to find a group
-
User inputs accordingly
-
System shows group details
Extensions
-
3a. User enters invalid input.
-
3a1.System shows an error message.
Use case resumes at step 2.
-
-
4a.System cannot find group.
-
4a1 System reports 0 groups listed.
Use case ends.
-
Use case: Delete a group
MSS
-
User logins to System and requests help to delete a group
-
System shows how to delete a group
-
User enters input accordingly
-
System shows group is deleted successfully.
Extensions
-
3a. User enters invalid input/format.
-
3a1.System shows an error message.
Use case resumes at step 2.
-
-
4a. Group is not in the System.
-
4a1.System shows an error message stating no such group exists.
Use case ends.
-
Use case: Edit a group
MSS
-
User logins to System and requests help to edit a group
-
System shows how to edit a group
-
User enters input accordingly
-
System shows group is edited successfully.
Extensions
-
3a. User enters invalid input.
-
3a1.System shows an error message.
Use case resumes at step 2.
-
-
4a. Group is not in the System.
-
4a1.System shows an error message stating no such group exists.
Use case resumes at step 2.
-
Use case: List all members a group have
MSS
-
User logins to System and requests help to list all members a group have
-
System shows a list of all members a group have
Use case: Add a member to a group
MSS
-
User logins to System and requests help to add a member to a group
-
System shows how to add a member to a group
-
User enters input accordingly
-
System shows a member is added to a group successfully.
Extensions
-
3a. User enters invalid input/format.
-
3a1.System shows an error message.
Use case resumes at step 2.
-
-
3b. Group or member is not in the System.
-
3b1.System shows an error message saying group does not exists/index of person entered is invalid respectively.
Use case ends.
-
Use case: Delete a member to a group
MSS
-
User logins to System and requests help to delete a member to a group
-
System shows how to delete a member to a group
-
User enters input accordingly
-
System shows a member is delete from the group successfully.
Use case: Create an Account
MSS
-
New user prompted to create an account
-
User enters create account command as prompted
-
System displays account creation success message
Extensions
-
2a. User enters a duplicate username (username already in use)
-
2a1.System prompts user to choose a different username
Use case resumes at step 2
-
Use case: Login to Account
MSS
-
User attempts to enter command
-
System detects that user is not logged in
-
System prompts user to either create account or login to existing account
-
User enters login command
-
System displays login success message
Extensions
-
1a. System detects that user is not logged in
-
1a1.System prompts user to login
Use case resumes at step 2
-
-
3a. User does not have an account
-
3a1.User enters create account command [the continuation of this extension can be found on create an account use case]
Use case ends prematurely
-
-
3b. User have an account
Use case resumes at step 4
-
4a. User enters wrong credentials (username and password combination does not match)
-
4a1.System prompts user on login fail and to try again
Use case resumes at step 4
-
Appendix D: Non Functional Requirements
-
Should work on any mainstream OS as long as it has Java
9or higher installed. -
Should be able to hold up to 1000 persons without a noticeable sluggishness in performance for typical usage.
-
Time zone,Time,Date format is standardised and is shown before user adds timetable.
{More to be added}
Appendix F: Instructions for Manual Testing
Given below are instructions to test the app manually.
| These instructions only provide a starting point for testers to work on; testers are expected to do more exploratory testing. |
F.1. Launch and Shutdown
-
Initial launch
-
Download the jar file and copy into an empty folder
-
Double-click the jar file
Expected: Shows the GUI with a set of sample contacts. The window size may not be optimum.
-
-
Saving window preferences
-
Resize the window to an optimum size. Move the window to a different location. Close the window.
-
Re-launch the app by double-clicking the jar file.
Expected: The most recent window size and location is retained.
-
F.2. Creating an Account
-
You can use NUS Hangs without creating an account. In that case, you are restricted to the following read-only commands:
-
help -
list -
find -
select -
find_group -
view_group -
view_slots_all -
view_slots_ranked
-
-
Prerequisites: The application is set up such that you have to login in order to create an account. This prevents unauthorized creation of account and manipulation of stored information.
-
Login with the following command
login u/admin pw/adminPassword -
Create a new account using
create u/newuser pw/strongerpassword -
Login to the new account using
login u/newuser pw/strongerpassword
-
|
At the current version, user account credentials are lost upon closing the application. If you restart the application during testing, you are required to create a new account or simply make use of the default admin account provided. |
F.2.1. Create command
-
Test case:
create u/newuser pw/pass
Expected: Account is successfully created. -
Test case:
create u/nopass pw/
Expected: Account is successfully created. The password field is allowed to be blank, although not recommended. This is a way to allow admin to quickly login to the application. -
Test case:
create u/ pw/
Expected: Account is successfully created. The username and password fields are both allowed to be blank, although not recommended. This is a way to allow admin to quickly login to the application. -
Test case:
create u/admin pw/pass
Expected: Account is not created as the username is already in use.
F.3. Read-Only Commands
These commands can be used regardless of whether the user is logged in or not.
F.3.1. list
-
List all persons and groups
-
Test case:
list
Expected: output multiple persons and groups in the list. -
Test case:
list 1
Expected: output the group that person 1 belongs to and filter the list to show only person 1
-
F.3.2. find
-
Finds all persons in NUS Hangs, whose contain keywords provided by prefix(es).
-
Test case:
find a/serangoon
Expected: list all persons in NUS Hangs with keyword 'serangoon' in their address -
Test case:
find n/yu
Expected: list all persons in NUS Hangs with keyword 'yu' in their name
-
F.3.3. select
-
Selects the person identified by the index number used in the displayed person list.
-
Prerequisite: the displayed person lists is not empty. Use
listcommand to display the current list of persons or usefindto create a custom filter of the list.-
Test case:
select 1
Expected: Selects the 1st person in the list
-
-
F.3.4. find_group
-
Find groups whose names contain any of the given keywords
-
Test case:
find_group sadfriends
Expected: List group with name that has "sadfriends" in it
-
F.3.5. view_group
-
shows a list of all persons in a group
-
Test case:
view_group n/happyfriends
Expected: shows a list of all persons in the group "happyfriends"
-
F.3.6. view_slots_all
-
List all of the available time slots in a group
-
Test case:
view_slots_all n/happyfriends
Expected: output list of all time slots at which everyone in the group is available
-
F.3.7. view_slots_ranked
-
List all time slots of a group in descending order of availability with a minimum number of people available required
-
Test case:
view_slots_ranked n/happyfriends num/1
Expected: output list of all time slots with at least 1 person available, if any, in sorted order
-
F.4. Add and Edit Commands
These commands can only be used if the user is logged in.
Prerequisites: login with the following command: login u/admin pw/adminPassword
Commands related to Person
F.4.1. add
-
Adds a person to NUS Hangs application
-
Test case:
add n/Johnathon p/98765432 e/johnd@example.com a/John street, block 123, #01-01
Expected: Adds a new person with the supplied details into the application -
Test case:
add n/Johnathon p/98765432 e/johnd@example.com a/John street, block 123, #01-01
Expected: Since the person already exist, we expect to see the following error message: "This person already exists in the address book"
-
F.4.2. edit
-
Edits an existing person in the application based on the given index.
-
Test case:
edit 1 p/91234567
Expected: Changes the phone number of the first person to 91234567
-
F.4.3. delete
-
Deletes the specified person in the application
-
Test case:
delete 1
Expected: Deletes the 1st person in the list; if any
-
Commands related to Time Table
F.4.4. add_timetable
-
Adds timetable to person specified by the index
-
Prerequisite: User to download timetable template first using
download_timetable [index]; where index is the index number of the person whose timetable you are trying to add. This template serves as an easy way to update the timetable of the user.-
Test case:
download_timetable 1
add_timetable 1
Expected: adds the timetable to person 1 from timetable from person 1 stored location.
-
-
F.4.5. edit_timetable
-
Edits a timetable timeslot of the timetable from the person specified by the INDEX.
-
Test case:
edit_timetable 1 day/wednesday timing/0900 m/Work on CS2103
Expected: Change the time table of person 1 on Wednesday, 0900 to "Work on CS2103" -
Test case:
edit_timetable 1 day/wednesday timing/0900
Expected: Change the time table of person 1 on Wednesday, 0900 to an empty slot; i.e. free slot
-
F.4.6. download_timetable
-
Download a timetable from the person specified by the
INDEXto the stored folder from the person specified by theINDEXas a csv file-
Test case:
download_timetable 1
Expected: creation of a .csv file in the respective folder
-
F.4.7. delete_timetable
-
Delete csv file of the timetable from stored location from the person specified by the
INDEXand adds a default timetable to the person specified by theINDEX.Resets the timetable of the person if there is no timetable in the stored location from the person specified by theINDEX.-
Test case:
delete_timetable 1
Expected: Deletes the time table of the 1st person in the list.
-
Commands related to Group
F.4.8. add_group
-
Adds a group to the application
-
Test case:
add_group n/Happy Friends d/a group of happy friends
Expected: New group is added and displayed on the list -
Test case:
add_group n/Happy Friends
Expected: Group is not added as it already exist
-
F.4.9. edit_group
-
Edit a group’s details.
OLDGROUPNAMEmust be entered. There must be at least 1 field non-empty. If field is empty, system assumes that the field remains unedited.-
Prerequisite: The target group exist in the list of groups.
-
Test case:
edit_group Happy Friends n/Sad Friends d/sad because of cs2103
Expected: Change the group "Happy Friends" into "Sad Friends" with the new group description -
Test case:
add_group n/New Group
edit_group New Group n/Sad Friends d/This won’t work
Expected: The edit won’t execute as the supplied new group name is already in use.
-
-
F.4.10. delete_group
-
Delete a group in the application by group name
-
Test case:
delete_group n/Sad Friends
Expected: Group successfully deleted -
Test case:
delete_group n/Sad Friends
Expected: Group does not exist, hence could not be deleted
-
F.4.11. register
-
Adds a person using the person index to a group if group exists
-
Test case:
add_group n/CS2103 Dry Run
register 1 n/CS2103 Dry Run
Expected: 1st person in the list successfully added into the group.register 2 n/CS2103 Dry Run
Expected: 2nd person in the list successfully added into the group.register 1 n/CS2103 Dry Run
Expected: Since the person already exist in the group, it will not be added again.register 1 n/CS2103 Dry Runs
Expected: As there is a typo in the group name, the person will not be added; unless the mistyped group does exist.
-
F.4.12. delete_member
-
Delete a person from a group using person index displayed with view_group
-
Prerequisite: view the details of any group in the list. For example,
view_group n/CS2103 Dry Run-
Test case:
delete_member 1 n/CS2103 Dry Run
Expected: 1st member in the group is deleted.
-
-